Welcome

Welcome! I'm so glad you stopped by today! If you're inspired by what you see, I invite you to follow along via one (or more) of the options on the side bar below.


Showing posts with label DIY. Show all posts

Wednesday, November 6, 2013

Inspired by . . . intentional gratitude

Being intentional about being grateful makes every part of our life better!

While it's true that this is something we should try to be all the time, people tend to be more demonstrative about their thankfulness in the month of November.

The trendy "Thanksgiving Tree" is just one of the ways you can be intentional about being grateful every day!

There are a lot of great ideas out there. Here are some of my favorites:


Julie, over at Savings by Design has some great ideas for the kiddos! With a large thankful tree and a thankful turkey, too!

Rebekah over at Simply Rebekah did a similar wall-tree. Here is her version – isn't it great!

thankful-tree5xx


I love these curly willow branches that Darcy Miller used for her family's tree!

CurlyWillow


I like this idea of using pictures, of people we're thankful for, as tags on the tree. I found this idea on pinterest, and it links to Aunt Ruthie's, but I couldn't find the picture once I got there. Maybe you'll have better luck!

PictureTags


Here is a neat idea that uses the tree as a centerpiece as well as an activity for your guests on Thanksgiving day.

Centerpiece


This one, by Mindy Starr over at Creative Juice, was by far my favorite!
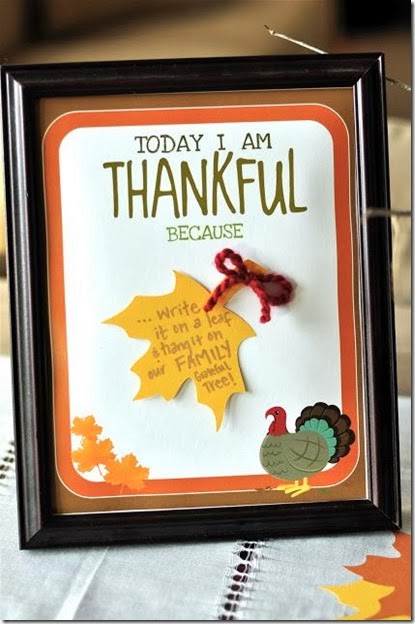
DailyLeaf


I love how Mindy and her family focused each day on what they were thankful for before hanging the leaf on their thankful tree! Great idea, Mindy!

There are a  lot of great ideas on Pinterest, so I encourage you to have a look for yourself!


There's still time to join our online Bible study group! You can learn more about it HERE.


Thanksgiving_FB_Ad


With gratitude,

Blog_Signature


Sharing inspiration here:

Little by Little One Artsy Mama

Thursday, October 24, 2013

Inspired by. . . a safe place

Since I last posted about Kitty I've learned that she has a condition called cerebellar hypoplasia. Thankfully, and this was one of my main concerns, the condition does not worsen with age. I already knew she wasn't in any pain (also a main concern) and I was able to confirm that as well.


Knowing that she can't easily defend herself against predators or unwelcome guests (i.e. male cats), I started researching cat enclosures. Talk about sticker shock!  I'm in the wrong business, that's for sure ~ha!  Just when I was about to give up, I found this website:

Catandcaboodle.com and their ingenious idea for a "homemade" cat enclosure!


KittySkwint


Kitty was a bit skeptical at first, but once I started putting the panels together she became interested!


KittyBars


The panels went together easily, and I had the enclosure complete in a couple of hours.


Enclosure


The kitty house I'd ordered came the next day. It has a thermostat controlled heating pad for those cool Texas nights, and an opening on both ends for safety. It's also waterproof. During inclement weather, we put a cover over half of the enclosure for added protection. It's very warm & cozy!


KittyHouse


I leave the enclosure open during the day so Kitty can get plenty of exercise, although she never goes more than a few feet away from the house. At night I close her in to keep her safe from unwelcome visitors. We get lots of cuddle time during the day.

If you've been looking for an economical cat enclosure I encourage you to check out the catandcaboodle website.  They have three pages of pictures showing many variations in design. Mine is very basic compared to what most people have done. If you build one, drop me a note, I'd love to see what you come up with!


Have a wonder-filled day!

Blog_Signature


Sharing inspiration here:

SixSistersStuff.com mop it up mondays

Sunday, November 4, 2012

Inspired by. . . a picture


I know most of you have moved on to Christmas. But hopefully there are few of you who plan to celebrate Thanksgiving {smile} and still need some inspiration for your front door.

It's been months since I've had the opportunity to craft and I've been itching to make a new wreath for our front door.  We're in the process of putting in flower beds and making a few other changes to the front porch, so the front door needed to have something pretty and welcoming amidst the general chaos!

While at Jo-Ann's picking up some supplies for the wedding invitations and wedding favors {post still to come} I was inspired by this picture:


JoAnns_wreath_poloroid


Love the rich gold-tones and little pears peeking through the leaves!  A dear friend had given me a gift certificate to another craft store, so I was $$$ flush and ready to shop for my wreath supplies! 

Have you noticed all the little owls making their appearance around blog land?  Isn't it fun when something you're already fond of becomes popular!  My grandmother was partial to owls and I have a special affection for them because of my memories of her.  After seeing Sarah's lovely creation over at Lacquer and Linen, I knew I wanted to add a sweet avian accent to my wreath, too!  After a quick review of my Inspired by... wreaths pinterest board and seeing the Fall Argyle Wreath from Create and Celebrate that I'd pinned last year, I was sure of it.


2012_Supplies


The most expensive part of this wreath was the sprig of pears at $8.00 {ouch!} – even with the gift certificate, that hurt. But the good news is, I only used half the sprig, so I have half left over for the next project!


2012_pears


After spray painting the wreath gold, I actually decided I liked it better in color, but there was no turning back!  However, after adding the ribbon, a few sprigs of some coppery colored bush (that I had not spray painted) and the little owl there was enough contrasting color to improve my opinion.


2012_closeup


And I really like how it looks against our green front door!


2012_Wreath


What's inspiring you this Fall?


Blessings,

Blog_Signature


Sharing inspiration here:

mop it up mondays

Tuesday, October 30, 2012

Inspired by. . . ribbon

I seem to remember promising you some DIY wedding inspiration a week or so ago.  Let's start with a DIY wedding invitation!

If you're planning a small scale wedding, designing and making your own invitations is very do-able!

First, let me share my inspiration:


Invitation_Inspiration_II

Invitation_Inspiration_III

Invitation_Inspiration_I


The original links to all of these can be found on my Pinterest "I do" board.


Now, here's mine. . .


Invitation_Standing


The detail on the paper I chose was more subtle than those pictured above and difficult to see in this photo. You can see it better in the image below.

When designing your invitation keep in mind what size envelope your invitation will need, and whether or not it will require extra postage. I formatted my size to fit some envelopes I already had on-hand.


Invitation_Supplies


Supplies:

~decorative outer paper, color/texture of choice

~cardstock for inner portion of invitation

~ribbon, color and width of choice

~glue runner

~cutting tool for paper

~scissors, for cutting ribbon

~envelopes and stamps


As I already mentioned, I designed this invitation to fit envelopes I already had on hand. So my process began with measuring the envelope. My outer paper size was cut to 10"W x 7"H, then each side was folded inward, as you see in the image. The wording was printed on the cardstock and then the cardstock cut to fit inside the folded outer paper.  I used approximately 1yard (3ft) of ribbon for each invitation. I know it sounds like a lot, trust me, you almost always need more ribbon than you think you do! In fact if your invitation is wider, it will take even more.

You want to be sure to get all the materials you need for this project the first time you shop. If you have to go back for more paper later, etc., you may find the store is sold out. I recommend making a "mock" invitation out of regular paper to confirm your measurements. Then use a piece of string, or any ribbon you may have on hand to test tie a bow. That will tell you how much ribbon you'll need for each invitation.

theknot.com has an invitation wording wizard, and other tips and examples you might find helpful.

Whatever you do, have fun with it! Make it personal, make it special – it's your wedding!


Invitation_Flat


Have a wonder-filled day!

Blog_Signature


Sharing inspiration here:

A Crafty Soiree homework

Sunday, October 14, 2012

Inspired by. . . more roses


Can one ever tire of roses?

I didn't look up the hardcore statistics, but my guess is that roses are the most used flowers at weddings. More and more brides are choosing to do much of the planning, preparation and even the implementation of their weddings themselves.

If you've decided to do your own table decorations and/or your own bridal bouquet, I highly recommend doing a "test run" before the big day.

There are a lot of informative, well-done instructional videos out there on how to make bridal bouquets and boutonnières.  Just remember, things don't always work out the way you envision them, so a test run {or two} beforehand will ensure your bridal bouquet and/or centerpieces look as stunning on your special day as they do in your mind.

Note: I found the you tube videos by Lily of the Valley Florists to be the most helpful. If the above link doesn't work search "Wedding Flowers & Floral Arrangements : How to Make a Bouquet for the Bride "

Here's an example of the centerpiece "test run" I did for the last weekend's wedding.


Roses_teacup

Wives, understand and support your husband in ways that show your support for Christ.

Husbands, go all out in your love for your wives, exactly as Christ did for the Church- a love marked by giving, not getting.


The "test" bouquet purchased at the local grocery store was not as fresh as it could have been and the roses had opened far too much to achieve the look I wanted. But the test run confirmed that with fresher, tighter blooms, the teacup arrangement would be perfect! Exactly the look I was hoping to achieve. {check back next week for the reception photos!}

The large, full blooms did not work well in the bridal bouquet either. Even being gentle with stems, the large blooms pushing against each other caused some of them to snap off. I recommend working with fresh, hydrated flowers with tighter blooms that are just beginning to open.

Some other things to think about, flowers will last longer if you can keep them cold. This may be challenging, especially if you're allocating refrigerator space for the cake and other food. I ordered my flowers for pick up the day before the wedding, ensuring they would be the freshest possible. But this also meant I had to set aside enough time the day before to make the bouquets and boutonnières. It's important to keep all this in mind when making your wedding timeline. #1 rule: Things always take longer to accomplish then you think they will.

A gentle warning: You don't want to add unnecessary stress to your wedding day, so consider this DIY project carefully before taking it on. Still want to DIY, but not do it yourself? Consider asking a friend or family member to do your flowers. It may be the perfect way to involve that person in your special day.

Here's a sneak peak at one of my pinterest inspirations, used in the final bridal bouquet:

Boquet_example

Thanks to Taryn over at Design, Dining and Diapers


I've got pictures of the bridal bouquet and more DIY ideas and tips to share with you, so check back soon!


Have a wonder-filled day,


Blog_Signature


Sharing inspiration here:

Skip To My Lou homework Boogieboard Cottage